Installation
If you've already installed blender Add-ons before, you should be familiar with this process.
{info.fa-info} The Add-on is not availible for download yet. We are finilizing the development and hope to release the add-on on the BlenderMarket soon. We do accept ideas and feature requests per mail.
Install
{info.fa-info} This Add-on only works for Blender Version
2.9and up!
- Download the
.zipfile - Open Blender as an administrator and go to
Edit -> Preferences -> Add-ons - Press
Install - Select the
.zipfile - Press
Install Add-on
After a while CitySketch should show up in the List of availible Add-ons.
{danger.fa-file-archive} The
.zipfile should not be renamed. The name should beCitySketch.zip!
Enable

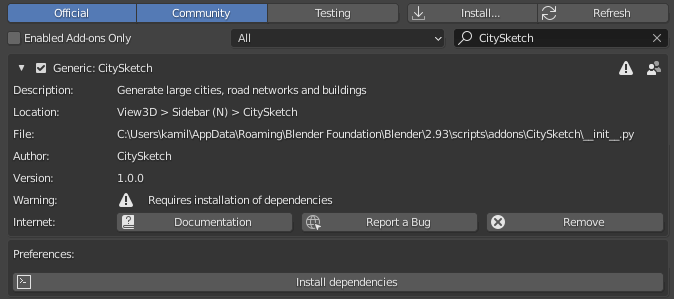
After installing the Add-on you can search the list for CitySketch.
Enable the Add-on by activating the checkbox next to the Add-on name.
Lastly, open the dropdown and press the Install Dependencies button (see image above). This will install the required python libraries (Shapely in this case). Depending on your setup, you might need to run Blender with elevated privileges/as an administrator. An active internet connection is also required.
After a short while the add-on will be ready to go.
You might need to restart blender if you're getting error messages.
Locate the Add-on

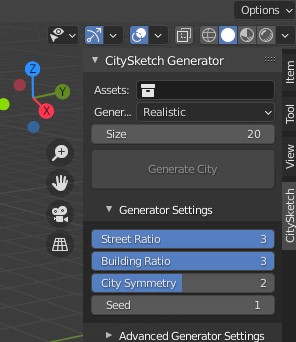
The main Add-on Interface can be found in the Sidebar.
Open the Sidebar by pressing N on the keyboard when in the 3D View.
Go to the tab named CitySketch
Here you will find the mail panel for the Add-on
Usage
CitySketch requires almost no setup, so you can use it straigt away.
Here is a minmal example showcasing the whole process.
-
Navigate to the Add-on Panel (See Locate the Add-on)
-
At the bottom you'll find the CitySketch Assets. Press
High Poly Asset Packto import the Asset Pack -
Press the primary button
Generate Cityat the top of the Panel
After a short while a 20x20 unit city with the default settings should appear. Please note, it might take slightly longer if thats your first time generating a city. The duration also changes depending on the Hardware you are using.